Release 2024.1 introduced a problem with printed invoices. Suddenly, part numbers were replaced with each item’s internal ID. At first glance I thought this a bad thing, but not so fast.
A field that we’d printed in advanced templates since 2017, displayname, suddenly morphed into an item’s internal ID. Clearly this was not our doing, but something in release 2024.1 had changed. Long story short, I suspect NetSuite is exposing more joined records in advanced templates. After contacting NetSuite, they provided a workaround where I’m swapping item.displayname for item.item.displayname.
I’ve previously written about how to find fields in advanced templates, but I’ll remind myself (and you) where to check what’s available in your Freemarker templates.
Start by opening your advanced template. It opens in Edit view. You’re looking at Freemarker/HTML code.
Toggle the source code button back to the WYSIWYG view. You won’t keep this view permanently, but here is where you get your list of available joins and fields.
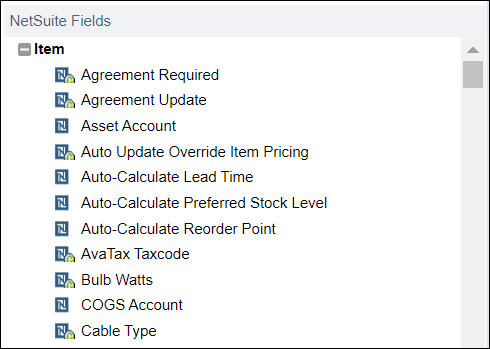
Then click the plus button.
At the bottom of the list are all your joined records.
Expand those to see joins and fields. In my case, I needed record.item.item.
I guess it’s possible item.item.displayname has been there all along and I missed it. My wife tells me she could rearrange the furniture in our entire home and it would take me weeks to notice. Dunno!
This was confusing and cost me a lot of time. A field must be editable and present on the form associated with your CSV import.
If you wish to make a custom field visible to users, but protect against modifications, you can change the display type. Your options are shown below.
If you select any option besides “Normal” you are effectively locking your custom field from UI initiated modifications. Normal is the default.
When you add your custom field to various forms, it propagates that setting. The setting can be modified later, but changing the setting in the definition of the custom field will not change it in the forms. you must actively change it when you reapply to forms.
During your CSV import, you can pick a form. The field must be included in the form and have a display type of “Normal” in order to update using CSV.
With your custom field present and modifiable on the form, it will show up in the list below.
Who would have ever thought the “Display Type” would affect CSV imports? Crazy!
As you architect a custom Suitelet, if you decide to include client-to-server “Restful interactions”, you can accomplish this without a Restlet.
This is the classic model: Suitelet delivers a page to the browser. Without reloading the page, client-side JavaScript interacts with the server to update the page in place. Classic restful behavior.
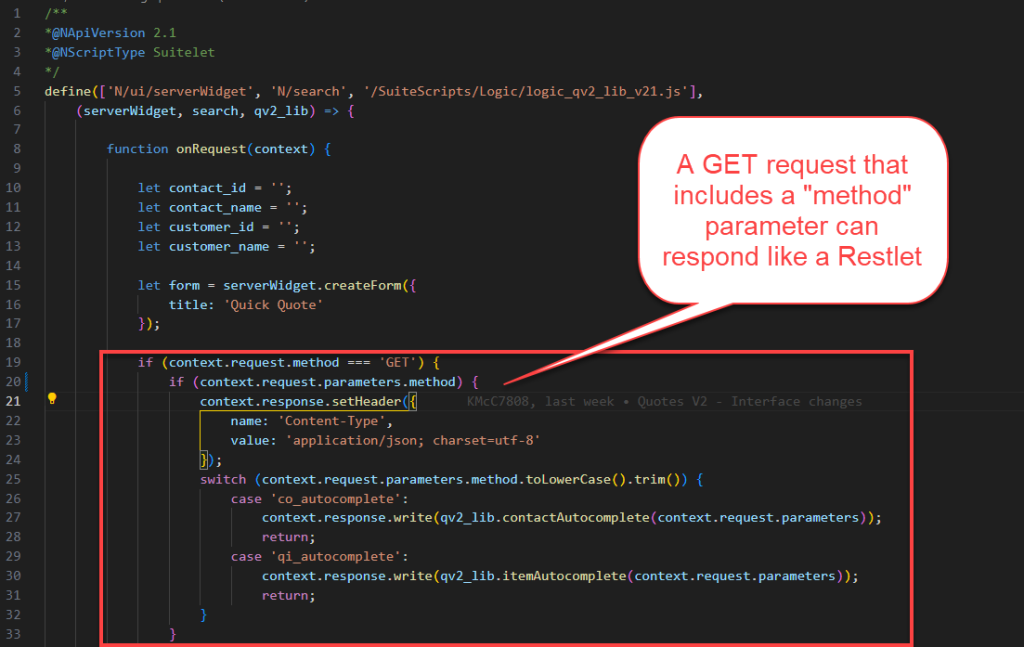
This is the model I’m proposing, A single Suitelet that functions as both the Suitelet and the Restlet.
The trick is to call your Suitelet from a client-side JavaScript AJAX request and include a parameter (in my case it is the “method” parameter) which tells the Suitelet to respond like a Restlet. The server’s response is a Jasonized object delivered to the client as a string. Note below that I’m adding a context.response.setHeader to change the content type to “application/json”.
In the following example, I’m demonstrating a Restful interaction between a jQuery UI auto-complete control and the Suitelet. My example is slightly more complicated than using auto-complete “out of the box”, where I’d pass the method parameter along with a second parameter “term”. I’m also passing some filter criteria in addition to the term which limits responses beyond what is typed in the auto-complete field. Hopefully that makes sense!
The auto-complete field is the one at the bottom under “Select a Contact & Company”. The filters are clearly marked and should be self explanatory. Sorry, I’m overly complicating my example. I’m not going to redo it just to include in this post.
Here is a version of the same client-to-server interaction with Chrome Dev Tools showing the network traffic. It’s lightweight and performant.
Finally, this is client-side JavaScript which calls the Suitelet. The URL might look like this:
The response is an object, “data”, which is NOT a Jasonized string. It can be referenced as-is, as an object, no parsing required.
In summary: I like the idea of having one script to both serve the single-page app and interact with the client-side JavaScript. If you prefer the classic model which includes the Restlet, be my guest. Potato, Po-tot-o, it’s all the same to me!
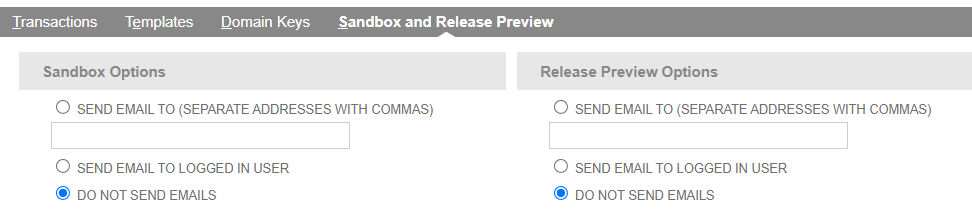
I went looking for a way to turn off emails generated by saved searches and workflows. After a sandbox refresh, all saved searches and workflows which send to customers, employees, or other outside entities continue to run. Instead of emailing the original recipient, they get redirected to the owner of the saved search or workflow. In my case, this meant lots of emails.
What I found… there appears to be only one option. Setup >> Company >> Email Preferences
I’m posting this as a reminder to myself, as well as admitting defeat. I’m asking for help if anyone reading this knows a better way. During my research, I found an article that stated “Programmatic updates to saved searches” is a pending enhancement. I looked at Mass Update, CSV Imports and SuiteScript.
I went as far as writing a program (this runs in debugger) which reads a list of scheduled saved searches and tries to update them. It’s close, but no cigar! If anyone wants to continue with this, go for it! However, if you make progress, please share with the rest of us.
require(['N/search'],
    function (search) {

        /**
         * This example loads a saved search that includes other saved searches that run on a schedule.
         * The important thing is the fields: id and recordtype.
         *
         */
        var mySearch = search.create({
            type: search.Type.SAVED_SEARCH,
            columns: [
                search.createColumn({ name: 'internalid' }),
                search.createColumn({ name: 'id' }),
                search.createColumn({ name: 'recordtype' })
            ],
            filters: [
                ['sendscheduledemails', 'is', true],
                'and',
                ['isinactive', 'is', false]
            ]
        });

        var results = mySearch.run().getRange(0, 1000);
        results.forEach(
            function (result) {
                var scriptid = result.getValue('id');
                var type = result.getValue('recordtype');
                var searchType = search.Type[type.toUpperCase().replace(' ', '_')];
                log.debug('type: ' + type + ', searchType: ' + searchType);

                /**
                 * In order to load a saved search, you must specify a search.Type.
                 * For "standard" types, like "customer", "Item", "transaction", you can translate
                 * the recordtype to an instance of search.Type. This will not work for saved searches
                 * against custom record types.
                 */

                try {
                    if (searchType != undefined) {
                        /**
                         * Once you correct identify and translate the search.Type, you can load the saved search.
                         */
                        log.debug('Attempting to modify: ' + scriptid + ' (' + type.toUpperCase().replace(' ', '_') + ')');

                        var mySearch = search.load({
                            id: scriptid,
                            type: searchType
                        });

                        /**
                         * Unfortunatley, you can make changes to settings without throwing an error.
                         */
                        mySearch.settings.scheduledalert = false;
                        mySearch.settings.triggeredalert = false;

                        /**
                         * AND... you can save the search without throwing an error.
                         */
                        mySearch.save()
                    }
                }
                catch (err) {
                    log.debug('error: ' + err);
                }
            }
        );
    }
);
Paystand is NOT a traditional payment gateway. It actually goes beyond that. It interacts directly with both NetSuite and Magento. An example: When a sales order is created in Magento and paid for using Paystand, a customer deposit is entered directly in NetSuite (and associated with the sales order in NetSuite) by Paystand. It’s awesome!
The Paystand bundle was initially installed in our provision of NetSuite by Paystand’s staff. We gave them access and they got it working. It was great. That was years ago. So earlier this year, we needed to do the same with Magento.
Paystand offers what they call a “Standard Plugin” for Magento. With this plugin in place, when a sales order is created in Magento and paid for via a credit card, the card is taken via an iFrame served from a Paystand server in the cloud. Once the payment posts, the payment details are appended to the sales order in Magento. It’s awesome.
With some additional customizations, Paystand will take this a step further and enter a customer deposit into NetSuite. This is where we ran into a LOT of confusion. Hopefully these notes will clear that up, for anyone including myself that ever needs to do this again.
To save time, I’m not going to tell you all the things that took us off track. I’m simply going to tell you how we did our “customizations”.
For starters, everything can be done from the NetSuite side. Our final solution included a very simple mod to Magento, whereby a new sales order triggered a RESTful API call back to NetSuite to start replicating the sales order in NetSuite. This could just as easily be done on a schedule, where a scheduled script wakes up on an interval and queries Magento for new sales orders.
Notes about the sales order in NetSuite… It MUST have the same total as the sales order in Magento. More on that in a second. One thing Paystand is not good at is acknowledging errors. If you break a rule, anything, no errors are thrown. One of the rules: A payment must be less than or equal to the NetSuite sales order’s grand total. Otherwise, it will be considered an overpayment.
Next, you’ll need the security tokens from your Paystand dashboard. You’ll find these values filled in in the Integration tab of your dashboard.
Use the Magento API to get a copy of the sales order in Magento. As you can see, the response is robust! It’s got everything.
Create the matching sales order in NetSuite and get it’s Internal ID. The payment section of the Magento sales order (after some time) will contain the Paystand payment ID. My example above was not a credit card payment (but a purchase order).
In our integration, we opted to use the Paystand API to get the payment ID directly from Paystand, without waiting for it to show up in the Magento sales order. The key to this is using the Magento quote_id. It is present in both the Magento sales order and the Paystand Payment. Matching the two produces a hard link between the sales order in Magento and the payment in Paystand.
Since you just created the new sales order in NetSuite, you’ve got all you need to make the association with Paystand. Here’s how that’s done.
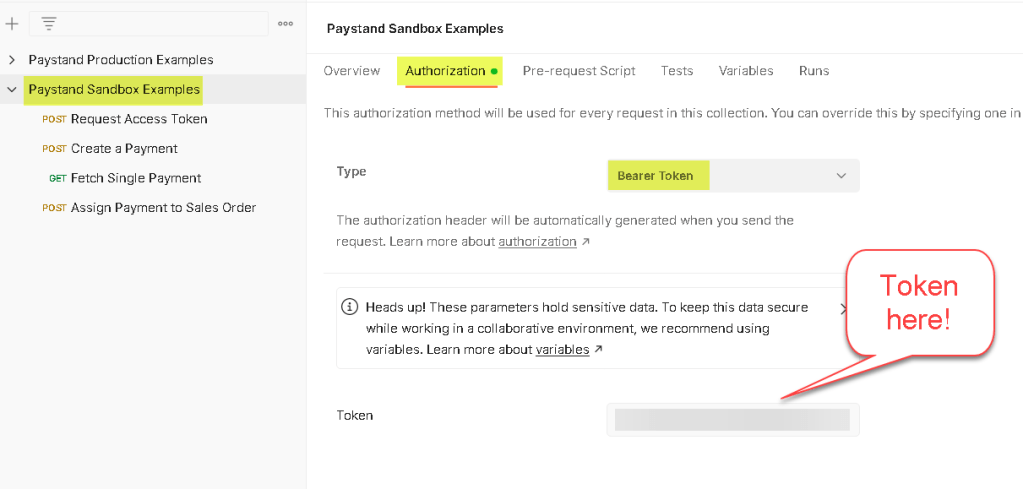
Request an access token from the Paystand API.
Use the token you just got back in the subsequent request. In Postman, I saved the token in the Authorization tab of the workspace. It could have gone directly into the “Assign Payment to Sales order” request header. Doing it this way is a good practice.
And finally, submit your request to associate the payment taken in Magento, with the sales order created in NetSuite.
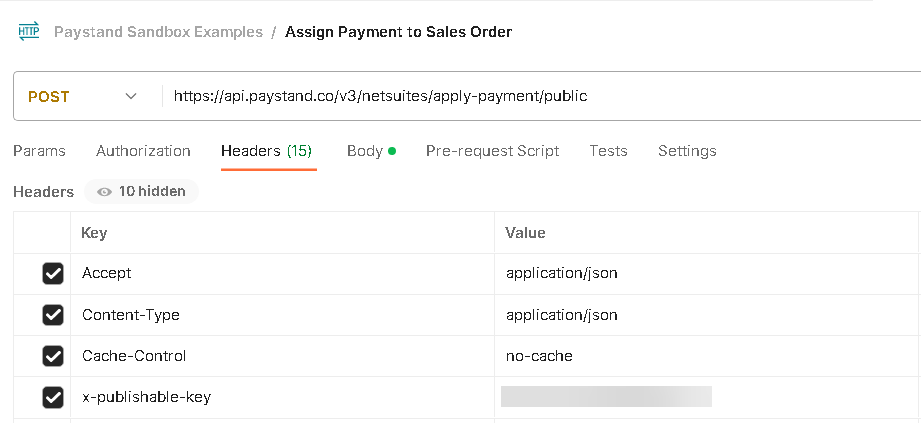
Here are the other headers entered directly in the “Assign Payment to Sales Order” request. I know, I just broke my own “Good practice” recommendation.
The response to this is one of two things, and I’ve made Paystand aware. Either it returns a security violation, in which case your token has expired or you’ve connected to the wrong website (there is one letter different between the production and sandbox Paystand URLs), or you get a string that says “true.” If you get “true”, it is not a guarantee that it succeeded. Problem!
One other bit of info that took us off track: We were initially told that we could not use Postman to make API calls to Paystand. This violated PCI compliance. Calling the Paystand API from outside your staging or production website would accept the call, but not honor it, doing nothing. This lead us to believe that all calls to Paystand must come from within Magento. This is absolutely not true! All of my Postman examples work (including creating and fetching a single payment) in both production and sandbox Paystand implementations.
In Summary: If you familiarize yourself with both the Magento and Paystand APIs, it’s a relatively simple task to integrate sales orders and payments between NetSuite and Magento. This article gives any decent developer enough info to do the integration in a couple of days. This is far less than it took my team and far less than we were told to expect by Paystand. It’s just not that complicated, which is a good thing.
There are products like Celigo and Boomi that integrate NetSuite and Magento. Having worked with one of them, I found it equally as complicated as using the native Magento API. Magento has a very robust API, so here is how I handled data synchronization between the two systems. I did it directly from within NetSuite.
First, I setup an integration in Magento. System >> Integrations
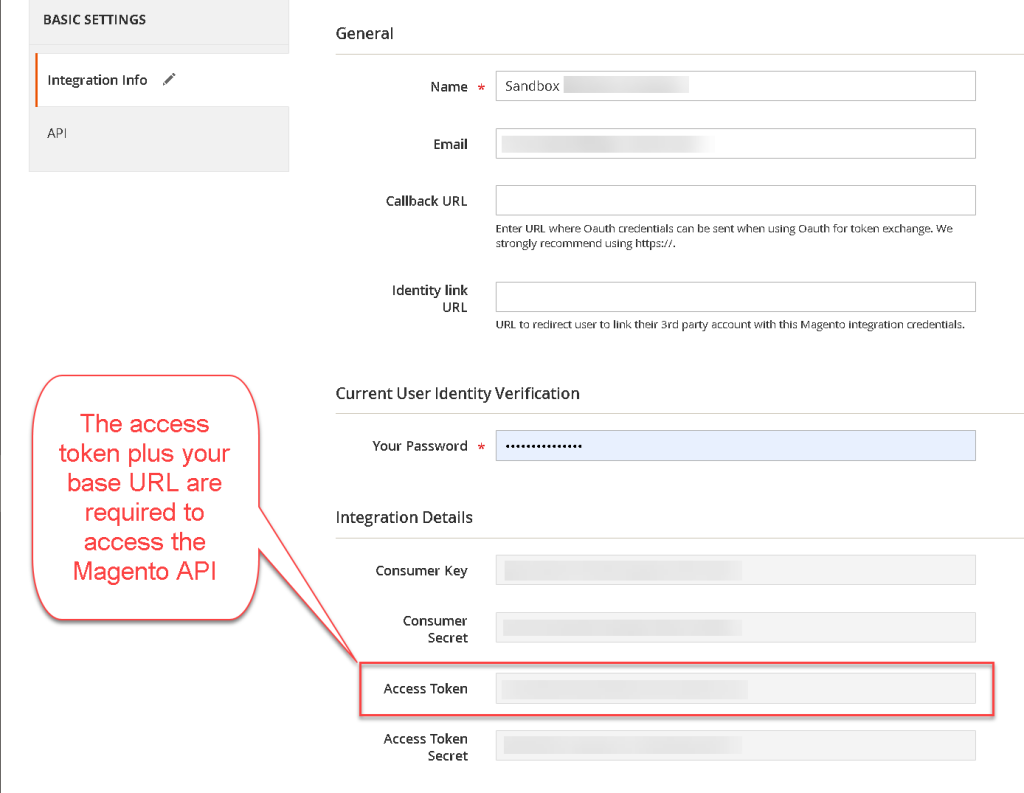
I created a new integration. Once you create your integration, you’ll need the Access Token to connect to the API.
I reviewed the API’s “Admin Endpoints” at https://developer.adobe.com/commerce/webapi/rest/quick-reference/ Get requests fetch data. Post and Put will add and update. I found that Post actually does both. It can add or update. I didn’t see that in the documentation, but found it to be true in practice.
Next, I coded up a number of example API calls using Postman (Freely downloadable tool). If you place the token you created ealier in the workspace, it can be inherited by all API calls under it.
Using the Admin endpoints, you can code up examples of “interactions” with Magento through the API. Here is an example of fetching a single product. Plug in your URL and your token in the workspace “Authorization” tab.
Translating this to code which runs directly in Netsuite looks like this. Obviously, the token you used above along with your URL replace the x’s. The response comes back as a Jasonized object in the response.body.
I found that using a Map Reduce script to collect whatever data you wish to move between the two systems in the getInputData method and then distributing all updates to the map method works best. In the example above I am updating a single product using a POST request. Magento also supports bulk inputs which allow you to submit multiple requests in a single API call. I’ve found this to be only slightly faster than doing it one at a time, and much harder to manage errors. If the requests are submitted in bulk, asynchronously, you much check progress, and once done associate each request with the response based on an identifier. If a single request fails, you’d get the error with an identifier which ties back to the actual (single) request that failed. Troublesome and only slightly faster. Once I got bulk requests working, I quit using them. The increased performance wasn’t enough to offset the extra work. Also, in my reading, I learned that Magento supports bulk inputs by simply creating an internal queue and processing each request one at a time. Pointless!
I found that in a Map Reduce script, I could fetch all products (or contacts, or categories, or whatever) by using the search feature of the Magento API. I’d get all the Magento & NetSuite products and match them in the getInputData method, passing whatever adds/updates/deletes were required to keep the data in sync to the Map method. Here is an example of reading all products from Magento.
I hope this helps clarify what is required to move data between NetSuite and Magento. It is a cheat sheet that I will refer back to myself so as not to forget lessons learned in my company’s move to Magento.
I needed a saved search to monitor activity. It needed to brake the last 2 days up into two slices, 1:00 PM yesterday to 8:00 AM today and 8:00 AM today until 1:00 PM today.
The point was to email activity occurring during the second half of the day yesterday to 8:00 AM today. And a second email with activity from 8:00 AM today through 1:00 PM today. I’m only showing the criteria for one of the two saved searches, the trick was knowing how to break out the hours of the day. I accomplished that using TO_CHAR({created}, ‘HH24’). This is the search criteria.
Notice the formula is type = numeric, so I can use “greater than” and “less than” comparisons, and I had to wrap the TO_CHAR() function inside a TO_NUMERIC() function. If you omit TO_NUMERIC(), everything appears to work, but hour “10” is then less than hour “8” in the formula, since the comparison is based on character strings and not numbers.
It seems AI is quickly making its way into developers’ tool bags. Here are some of my initial observations.
Chat-GPT: It’s great for writing functions or stubbing off SuiteScripts. I have not had much luck with a scope greater than a single function. I submitted the following to Chat-GPT and was happy with what it spit out.
“Write a Suitelet in SuiteScript version 2.1 that does nothing.”
It responsede as follows:
/**
* @NApiVersion 2.1
* @NScriptType Suitelet
* @NModuleScope SameAccount
*/
define([], function() {
/**
* Definition of the Suitelet script trigger point.
* @param {Object} context
* @param {ServerRequest} context.request - Encapsulation of the incoming request.
* @param {ServerResponse} context.response - Encapsulation of the Suitelet response.
* @Since 2015.2
*/
function onRequest(context) {
// Do nothing
}
return {
onRequest: onRequest
};
});
It was faster to use Chat-GPT to create this script, which I will use in debugger (after making the necessary changes), than it would have been to copy and rename a template. You can do the same for event scripts, map/reduce, scheduled, etc. It understands them all.
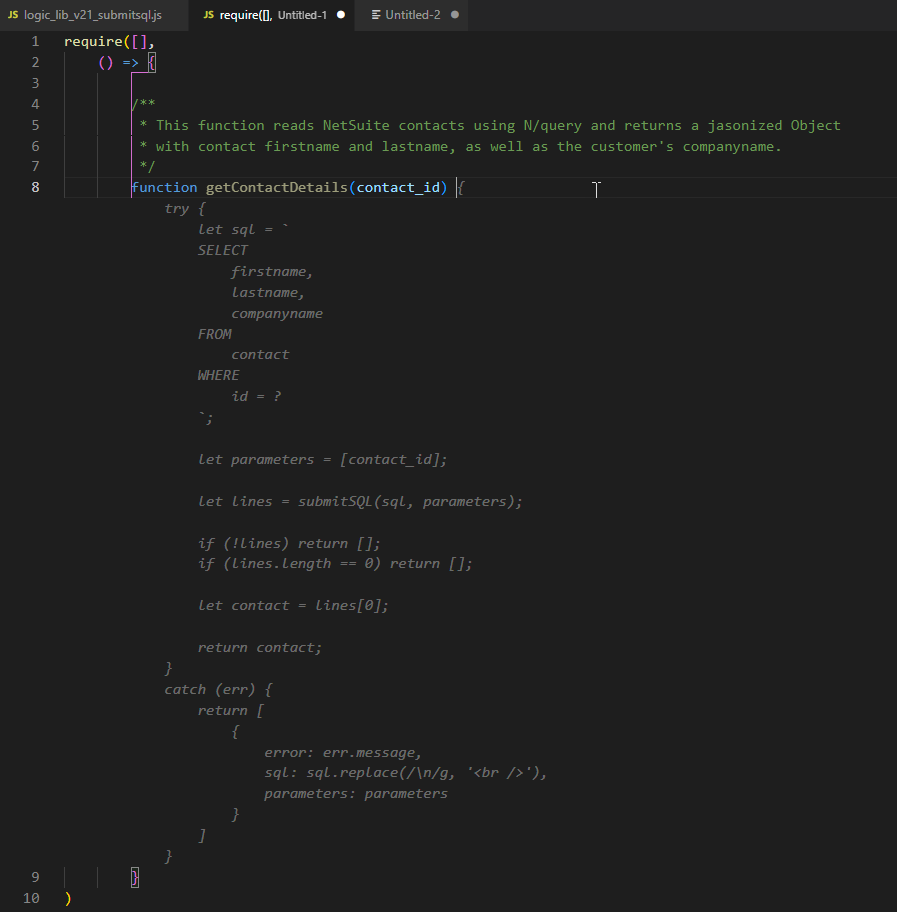
Copilot: I am much keener on Copilot than Chat-GPT in its current state. Copilot costs $10/month after a month free trial. It's worth it! Copilot will interrogate other open files/programs in vsCode, adding intellisense which incorporates functions from those files. Copilot can write whole functions, but not whole scripts. If you write a comment ahead of writing the function name, it reads your comment and incorporates that into its suggestion. In this example, I have a library open (logic_lib_v21_submitsql.js) in another tab. That library has a method called submitSQL() which accepts 2 parameters, a PL/SQL query and parameters used in the query. After writing the comment and naming the function, here was it's first suggestion.
Notice that it does not understand that companyname is not a field in the contact table. A join is required to reach companyname. It also gets the where clause wrong in the query.
When I hit [Alt] + ], here was the second suggestion, much improved! The join is still missing, but the where clause is correct. It ads a try/catch block and returns a single contact, which matches the comment.
Next, a couple of minor tweaks, adding a join to include customers, where Copilot was smart enough to auto-complete the join…
In summery (and I need to wrap it up), it’s been fun to see how AI is progressing in my industry. As developers, we are all joking now that Open AI is going to replace us. I’m old enough to know this is not true, but it can certainly change the way we write code. I’m all about efficiency, and these new AI-based tools are poised to significantly ramp up productivity.
If you use advanced templates and item groups, you got problems! Although Freemarker is a wonderful templating language, it is not a programming language. Here are some tips and tricks I learned when dealing with item groups and advanced templates.
Rule #1: The scope of variables in Freemarker is somewhat illusive. I’ll spare you the details, but recommend using unique variable names in all functions. You’ll see that in my examples.
Rule #2: Freemarker supports the creation of objects with properties. However, it will not let you update an object after it’s been instantiated.
Rule #3: If you are going to work with numbers, make double sure that whatever you’re working with is a number, variable!0 does not accomplish this.
Below is code taken from an advance template applied to sales orders. This section is where I check to make sure there are items and then looping through them to print each one on the PDFed output.
As I’m looping through all items, you see on line 503 I pass the index of the current item to the getItemDetails() function that returns an object with properties taken from the current line.
Here is where you hit a problem with “Item Group” items. Item group items consist of a “Group” line with a quantity but no unit price or extended price, followed by items of varying types, each with a quantity and unit price, followed by a “Group End” item, again with no quantity or unit price. In order to show the group item correctly with the correct totals, you need to read all items in the group keeping track of the totals yourself. Here is the twist. If the quantity on the group is not 1 and quantities of items in the group are not 1, you’re hosed! In order to get your unit price, you need to calculate the extended price of each line. When done, take the total and divide by the quantity on the original group item. This is unbelievable to me, but the quantities of items in the group already reflect the quantity of the group, BUT can be modified.
As an example, let’s say you have a group of dinnerware with quantity of 2. The items in the group are 4 plates and 4 cups. The group item will show quantity of 2. The quantity of plates in the group will be 8 and the quantity of cups will be 8. The extended price of each line must be calculated as quantity * price. If for some reason, and this is definitely possible once the group is initially added to the order, someone edits the line associated with plates and changes the quantity back to 4, the group’s total unit price and extended price can no longer be calculated by summing the unit prices of all lines and multiplying by the quantity on the group. I hope that’s not too convoluted, but it’s still true! Try it yourself. Groups, unlike Kits, can be modified independent of their definition.
So keep reading…
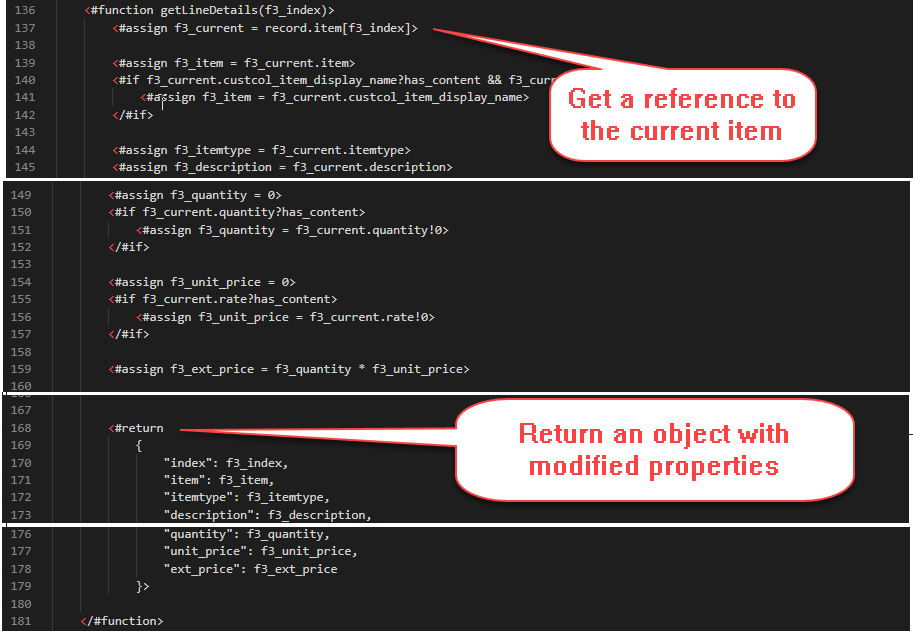
In line 185, you see a call to getLineDetails, which returns an object. Then lines 192 through 215 “read ahead” looking for the end of the group, keeping track of each line’s extended price (quantity * unit price). When the end of the group is located, the original line, the “Group” line, gets the total extended price. The group’s unit price is then calculated as the extended price divided by the quantity on the group. This “fixes” all the changes made to unit prices and quantities of items in the group after the group was added to the order. Inconceivable (Princess Bride)!
From before, where we called getItemDetails, you see it returns an object with modified properties. It also skips over items inside a group item, calling getGroupDetails to accumulate all details associated with the group into one object with the correct properties to print in that line.
And finally, you’ll see references to updateLine(). You’ll find that you can create objects, but you cannot modify properties of an object once it’s been instantiated. So…. you need to clone the object with the updated property and move forward with the replica. You’ll see how that is done here.
I am unable to give you the code in a form that can be copied. You may have already noticed the missing line numbers and lines through my screenshots. That is because I have removed references to the “secret sauce.” My wife just finished a 9 week cooking class taught be a master chef. She told me she learned that many of the great chefs tweak their recipes ever so slightly in cookbooks, as they don’t want anyone copying them with the result being as good as the original. I don’t consider myself a proud programmer and I’m not trying to water down the lesson, but there are some trade secrets here that you’ll just need to discover for yourself.
Best of luck, and I hope this enlightens both you and me (as I often return to these blog posts as notes). Freemarker is quirky, but it’s all we got!
I just stumbled into this today and it is extremely helpful when editing HTML or JSON in vsCode.
I was editing a NetSuite Advanced Transaction Template which is written in Freemarker. There is no interactive debugging of templates in NetSuite, so I wanted to show variables as part of the page. I wanted variable names, followed by the variable’s value. Here’s how easy this was, and I hope this makes it easy to see other uses for the multi-line copy and paste functionality in vsCode.
First, here is how it works. Then I’ll share the keystrokes.
First, I pasted in the variables. I actually used the same multi-line edit capabilities to create the list from Freemarker <#assign> statements higher up in the page.
[ctl] + [alt] + [shift] to select the lines for multi-edit. Of course you [down arrow] to include multiple lines.
[home] to move to the beginning of each line.
[shift] + [end] to highlight the entire line.
[ctl] + c to copy within the line.
[end] to jump to the end of the line on all lines
I typed “: ${“, which completed the brackets and left the cursor in between brackets.
[ctl] + v to paste the duplicate variable names
[end] to jump to the end of each line
I typed “<br />”
I could see this being extremely handy when creating arrays of JSONized objects in JavaScript, or tables in HTML. I hope this helps all my fellow lazy typists to spend more time writing code and less time formatting code.